Note
Access to this page requires authorization. You can try signing in or changing directories.
Access to this page requires authorization. You can try changing directories.
Azure DevOps Services | Azure DevOps Server | Azure DevOps Server 2022 | Azure DevOps Server 2020
Azure DevOps projects contain Git repositories, work items, builds, and releases. You can use Git repos in your projects to manage your source code as your project grows. This guide shows you how to create a Git repo using the web portal.
Prerequisites
| Category | Requirements |
|---|---|
| Organization | An organization in Azure DevOps with a Git repository. |
| Permissions | Create repository permissions, granted by default to project administrators. For more information, see Set Git repository permissions. |
| Tools | - Git for Windows, which includes Git Credential Manager, or Git for macOS and Linux. For macOS and Linux, we recommend configuring SSH authentication. |
Create a repo using the web portal
Clone the repo to your computer
To work with a Git repo, you clone it to your computer. Cloning a repo creates a complete local copy of the repo for you to work with. Cloning also downloads all commits and branches in the repo and sets up a named relationship with the repo on the server. Use this relationship to interact with the existing repo, pushing and pulling changes to share code with your team.
Work with the code
In this step, we make a change to the files on your computer, commit the changes locally, push the commit up to the repo on the server, and view the changes there.
Browse to the folder on your computer where you cloned the repo and open the
README.mdfile in your editor of choice.Make some changes, for example add
This is my first edit.to the file, and save and close the file.In the Git command window, navigate to the
fabrikam-fiberdirectory by entering the following command:cd fabrikam-fiberCommit your changes by entering the following command in the Git command window:
git commit -a -m "My first commit"When you use
git commit,-ameans to commit all changed files, and-mspecifies a commit message.Push your changes up to the Git repo by entering the following command into the Git command window:
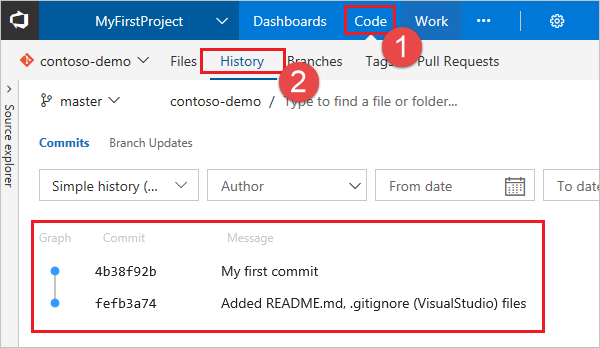
git pushSwitch back to the web portal and select History from the Code view to view your new commit. The new repo has two commits. The first is the commit where the README and .gitignore were added when the repo was created. The second is the commit you just made.
Switch to the Files tab and select the README file to view your changes.
